We released Back Lot Island to everybody yesterday, and Poptropicans everywhere rushed to complete it. These ten players got there just a little bit before the rest.
If you haven't played Back Lot Island yet, now's the time! Visit Poptropica now to play Back Lot Island.
Hey guys! Now that Back Lot Island is here for non-members, we can start with the walkthroughs! (Credits to: Captain ThinkNoodles and Fierce Moon)
Here's The written Portion!
Back Lot Island consists of 9 Areas. Two of the areas are outside the movie studio and seven of them are inside the studio reachable by a cart, similar to the Lunar Rover on Lunar Colony.
Main Street
Sunrise Street
Back Lot Entrance (get cart)
Soundstage 1
Kirk’s Trailer (use cart)
Soundstage 2 (use cart)
Soundstage 3 (use cart)
Soundstage 4 (use cart)
Post Production (use cart)
Main street contains a number of different stores (left to right):
Celebrity Wax Museum (common room)
Queequeg’s Coffeehouse
Digital Dreamscapes Studio
(Your Blimp)
One-of-a-Kind Talent Agency
A 2nd Queequeg’s Coffeehouse
Sunrise Street contains two other buildings:
Chinese Theater
Entrance to Grand Majestic Studios
Overview
In order to complete Back Lot Island you must first find a way inside the Grand Majestic Studio, then you have to help the famous director Carson Willis complete his film. Unlike many other Poptropica islands, there is no villain.
Part One: Enter the Studio
Part Two: Get Kirk His Coffee
Part Three: Monkey Around (Soundstage 4)
Part Four: Build the Prop Train, Cast the Cowboys, Create the Effects (Soundstage 3)
Part Five: Find Goldie, Get the Script, Find a Lead Actress, Act! (Soundstage 2)
Part Six: Post Production
Part Seven: World Premiere
Bonus Quest
PART ONE: ENTER THE STUDIO
As always, you land on main street. You’re immediately accosted by paparazzi who think you’re a celebrity. Alas, you’re not. They run off when they see former child star Willy Bingleman going into Queequeegs.
Go right and go into the One-of-a-Kind Talent Agency. Talk to the talent agent. She’ll send you to Harvey Scoops. Go right to Sunrise Street area.
Head right, cross the street, at the tourists, click on the ground to see the hand and footprints of Carson Willis. The tourists tell you Carson was one of the greatest filmmakers of all time, until his career went “off the rails”.
Keep going right until you find this guy, Harvey Scoops:
Talk to him and he’ll tell you he’s investigating activity at the Old Grand Majestic Studios. Rumor is that something’s going on inside the studio walls. When you offer to help, Harvey asks you to climb the nearby building and take a picture for his blog. He gives you a TELEPHOTO CAMERA. Unfortunately, you won’t have any idea how to use this old-fashioned camera. So, you need to find someone who can teach you.
Go left back to Main Street. Go all the way to the left, across the road, until you find the old man with the camera around his neck hanging out in front of the Celebrity Wax Museum. Use the TELEPHOTO CAMERA. He’ll give you CAMERA FILM.
Now go back to Sunrise Street to the green and purple building, Juan’s Celebrity Souvenirs. Jump up until you’re all the way at the top and right on a small balcony. Use the CAMERA FILM. Then use the TELEPHOTO CAMERA. You’ll be looking through the lens into the studio. You’ll see a man with a beard and then…
Earthquake! The balcony collapses and you fall inside the walls of the studio.
When you wake up, you’re in a mystical land of waterfalls and castles with a small dog barking at you. It’s the magical land of…nope, sorry, you’re on a movie set in an area called the Backlot Entrance.
PART TWO: GET KIRK HIS COFFEE
Head left and click on the big gates of the studio to open them. You need them to be open later.
Now, go right until you find the doors to Soundstage 1 with the blinking “Recording in Progress” light above it. Click on it and a woman will appear asking if you’re from studio security. She tells you that the legendary director Carson Willis is really close to finishing his movie and that she’s his assistant director Sofia May. She tells you it’s okay to go inside and check things out, just stay out of the way. Enter Soundstage 1.
Inside the soundstage, walk left until you’re on the set. Oops, you ruined the scene! The star Kirk Strayer storms off. Exit the soundstage and talk to Sofia. She tells you to take the cart and go get Kirk out of his trailer. Go right and click “Ride” on the cart.
Similar to Lunar Colony, the cart uses an overhead map which shows all the buildings inside the walls of the studio. Left clicking makes the cart accelerate. Use the mouse to aim your cart. You’re looking for Kirk Strayer’s trailer. Head south out of the parking lot of Soundstage 1 until you’re on the main studio street. Keep going south until you come to an intersection. Go east, then north into the parking area. Kirk’s trailer is in the north part of the lot. Click on the trailer.
Talk to the director, who’ll tell you there’s no movie without the star. Click on the trailer door. Kirk will tell you that he’ll come out if you refill his half-caf, double…wait, half-caf, latte, double espresso…wait…it’s a half-caf leviathan latte-espresso! Pick up KIRK’S empty HALF-CAF LEVIATHAN LATTE-ESPRESSO CUP. Time to head to the Queequeeg’s Coffeehouse!
Get back in your cart, go south out of Kirk’s trailer lot, go west to the intersection, go north and then west to the water tower and the parking lot for Soundstage 1. Click on Sunrise Street to exit. Go back to Main Street and enter the first Queequeg’s you come to, to the right of the Talent Agency.
Talk to the barista. They’re out of half-caf leviathan latte-espresso. But you can get a Full-Caf Infant Espresso instead by clicking on each item. Press Buy and you’ll get an INFANT SIZED-COFFEE (full espresso).
Now go to the second Queequeg’s Coffeehouse, to the left of the Digital Dreamscapes studios. Talk to the barista to get the menu. Click on Latte, Infant, and Decaf to get an INFANT SIZED-COFFEE (decaf latte).
You see where this is going, right? Kirk wants a half-caf, half-decaf, half-latte, half-espresso cup of coffee. Go into your backpack and Use one of the INFANT-SIZED COFFEEs. Then click on each cup and use your mouse to position the small cup over the large cup to pour it. Once you’ve poured both: presto! One HALF-CAF LEVIATHAN LATTE-ESPRESSO. Phew.
Head back to Kirk’s trailer on the studio lot and click on his trailer door. Hurrah, the coffee has calmed him and he’s ready to work again. The director is thrilled and asks you to come see him in Soundstage 1 for some more errands. Go back to Soundstage 1.
Camera Game Just as you enter the soundstage, the cameraman walks off. The director asks you to film the next scene. Jump up on the camera platform and click on the camera. The goal is to keep Kirk in the center of the camera shot the whole time. It’s a little tricky. The gray circle that represents the center of the frame is sensitive, so you have to move it slowly. At the same time, Kirk will move quickly when he gets scared or cold. It might take a few tries. Once you get it, the director will thank you and ask you to drive around the studio and see if you can help out with other tasks to help finish the movie.
[EDIT: Okay, this can be a LOT harder if the computer you're using isn't responsive enough. The first time I tried this it only took me three tries. But when I tried to do it when I was recording, it took me over a hundred times and I still couldn't get it, because the video software was slowing my computer down too much. SO, if you're struggling with this, try shutting down all of the software except your browser OR...try a different computer.]
PART THREE: MONKEY AROUND
At the bottom right of the cart map is Soundstage 4. Inside you’ll find Carson Willis directing Kirk in a monkey suit. Kirk throws a tantrum and walks off. Ready to be a star? Walk by the gorilla mask and costume to put them on. Then jump on the stage.
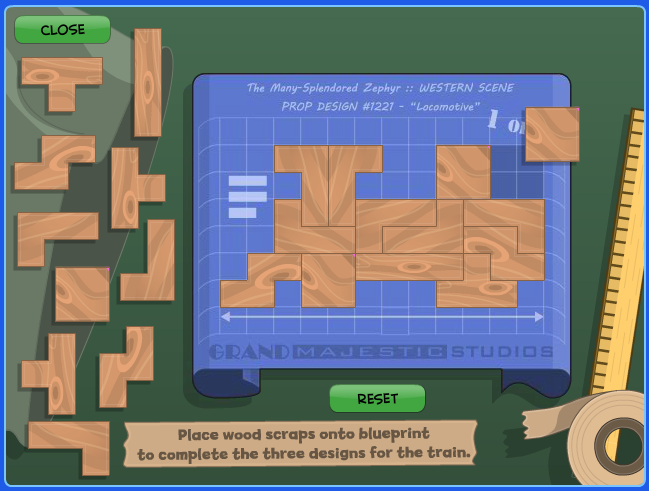
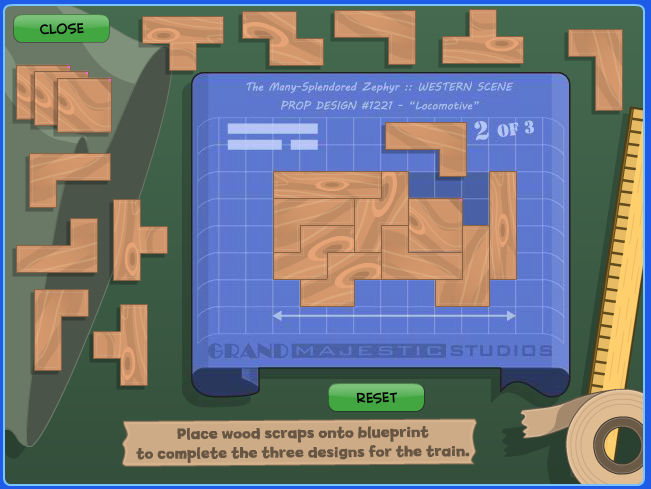
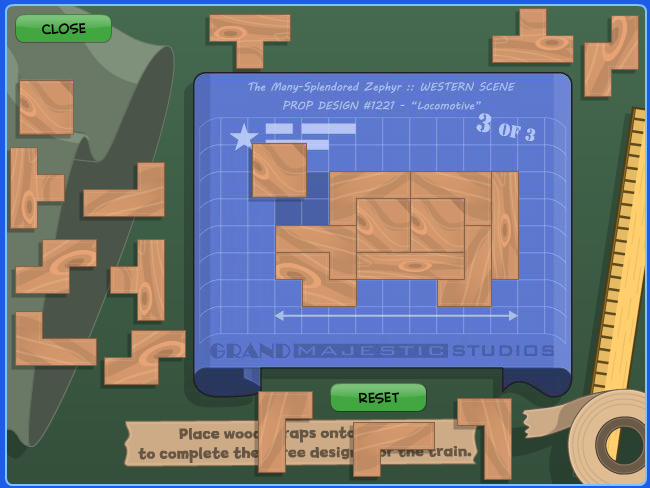
City Destroy Game Game description: “Jump on the rooftops all the way to the top to collect the red balloon. Be sure to pop all the green balloons on the way.” While you’re jumping, cannons will be shooting at you, slowly lowering your “life” bar. The trick is that you can destroy the cannons by hitting them and you can smash the army men by landing on top of them. There’s one level that’s the toughest because it has three army men. Try to jump on all three of them at once. When you get the red balloon, you win. PART FOUR: SOUNDSTAGE 3 – BUILD THE PROP TRAIN, CAST THE COWBOYS, CREATE THE EFFECTS Soundstage 3 is on the opposite side of the studio from Soundstage 4 at the bottom left of the studio map. The entrance is on the western side. Take the cart there. Sofia (boy, she gets around) tells you that the set-builder is a no-show. You need to sift through the props to build a prop train. Click on the large prop bag to the left.
Build the Prop Train Using your mouse, click on the different pieces of wood to fill out the train blueprints. There are more wooden pieces than you need, so there are multiple ways to complete each puzzle. Below are three possible ways:
Cast the Cowboys Once you’ve built the train, Sofia will ask you to grab the hats and fill out the parts with out-of-work actors milling around Sunrise Street. Jump up to the second level and grab the white and black cowboy hats. Then exit the soundstage and head to Main Street.
Go into the first Queequeg’s and offer Willy Bingleman the BLACK HAT (use it in front of him). Next go into the Digital Dreamscapes studio and go left until you find actor in the motion-capture suit. Offer him the WHITE HAT. Head back to Soundstage 3 and talk to Sofia.
Create the Stage Effects The actors are on a treadmill. You have three possible stage effects buttons below them: a tornado, a villain (hat), and a buffalo. Simply hit the button when the director calls for that thing. It’s easy. PART FIVE: SOUNDSTAGE 2 – FIND GOLDIE, GET THE SCRIPT, FIND A LEAD ACTRESS, ACT!
Find Goldie Exit the soundstage and jump in the cart. Head northeast from the Soundstage 3 lot to the opposite side of the studio cart map to Soundstage 2.
Inside you’ll find assistant director Sofia May. Talk to her and she’ll tell you that you need to find Goldie and get the script. He’s “probably in his usual spot, head in the clouds”. That right there is what they call a clue. Go back to Soundstage 1 and jump up onto the roof of the soundstage. You’ll see the pipe-smoking screenwriter, busily typing away at a screenplay. Click on him to talk to him. His brilliant screenplay will blow away and land on Sunrise Street. Head there.
Get the Script There are four pages, two on Sunrise Street:
stuck on the TV antenna on top of Juan’s Celebrity Souvenirs
at the very top of the Chinese theater. The sides of center part of the roof will help you bounce to reach it.
And two on Main Street:
in the neon sign on top of the first Queequeg’s, to the right of the Talent Agency
on the far left of the roof of the Celebrity Wax Museum
Head back to Soundstage 2 and talk to Sofia who will tell you that the script pages are out of order. Go into your backpack and examine the page. Use your mouse to place the gold numbers onto the correct page.
Page 1 begins: “The Many-Splendored Zephyr…”
Page 2 begins: “PILOT: ‘I know what you’re thinking. You can’t come with!’”
Page 3 begins: “PILOT: ‘What is it?’”
Page 4 begins: “The NAVIGATOR smiles bravely…”
Find a Lead Actress Talk to Sofia again. She tells you that the lead actress never showed up. They need a “Lacey Williams type.” Sofia gives you an ACTRESS HEADSHOT to match.
Go to the Talent Agency on Main Street. Use the ACTRESS HEADSHOT next to the talent agent (who looks vaguely familiar). Yup, it’s Lacey Williams herself! Head back to Soundstage 2.
Act the Role of Navigator Talk to Sofia and she’ll tell you that you need to act the role of the navigator! Quick, get in costume. Jump up to the dressing room at the upper left hand side of the room and click “Get Dressed”.
Now that you’re in costume and the camera is rolling, you need to remember your lines! Did you read the script? No? Well, here you go…
“But–”
(Offer her a compass)
“Safe journeys! I’ll never forget you!”
“Noooooo!”
Nice acting! Exit the soundstage and head to the Post Production building, at the bottom of the cart map, towards the center.
PART SIX: POST PRODUCTION
Enter the Post Production building. Inside you’ll find the director who tells you the first thing you need to do is edit the film. Follow him into the Film Editing bay. Click on the film editing machine.
Film Editor “Can you find the mistake? Scrub through each scene and locate the frame with the error, then splice it out with the razor.” You’ll see three rolls of film. In each roll is something that is off. The first one has a yellow banana, the second one has a boom mic in shot, and the third one has stuffing coming out of the bear. Use the bar at the bottom of each roll to move it forward or backward one frame at a time. When you see the mistake, click on the razor blade at the right. Then left click and hold to cut between the green lines. Cut above the film cell and below it to splice it out. Do it three times to finish.
Click on the director who will tell you it’s time to add sound. Follow him into the sound editing bay to the right. Click on one of the sound effect props.
Foley Sound “Each of the scenes needs four sounds added at the right time. Click on the correct sound when you see the indicator flash on screen.” There are 16 sound effect (SFX) buttons along the bottom. In the middle is a rolling film. At the top is a digital screen which will flash and tell you which SFX button to hit.
First clip:
Rain (rustling paper)
Thunder (metal sheet)
Balloon popping (balloon)
Balloon hitting water (cup of water)
Second clip:
Fireplace (match and can)
Plates rattling (plates)
Bear growling (bear)
Ghost moaning (ghost)
Third clip:
Buffalo (buffalo)
Horses galloping (coconuts)
Train (brushes and whistle)
Punch (paddle and meat)
Fourth clip:
Airplane (fan)
Kong landing on building (anvil hitting box)
Gorilla howl (gorilla)
Kong falling (bottle)
Follow the director and talk to him. He’ll give you FILM REELS to deliver to the theater while he has mysterious other business to attend to. Head to the Chinese theater on Sunrise Street.
PART SEVEN: THE WORLD PREMIERE
Sofia May is waiting for you in front of the Chinese Theater. The marquee shows: “Now Playing: The Many-Splendored Zephyr, The new film from Carson Willis, World Premiere”. Talk to Sofia and she’ll explain Carson’s behavior. Then enter the theater.
You need to get to the projector. Jump up onto the stage at the far right, then onto the theater boxes with the critics in them. Jump across them into the balcony. Then head left to the projector. Go into your backpack and use the FILM. Enjoy the movie!
Once the movie’s over, head outside to get your medallion. Congratulations, you just completed Back Lot Island!
BONUS QUEST
But wait…there’s a bonus quest to be had. Sofia tells you that a camera was left on in Soundstage 1. The bonus quest description: “Sneak into the studio and evade security to win a new prize in this island’s bonus quest! Plus, get a bonus prize pack of costumes and items.”
Enter the studio and go to Soundstage 1. Jump up to the camera to grab it. Just as you do, the Warren sisters, the owners of Grand Majestic Studios, will catch you and accuse you of trespassing. You hightail it out of there.
Avoid Back Lot Security “Avoid and outlast the Back Lot security. Collect (rockets) for speed boosts. Collect (green balls) for extra protection.”
You’ll be in your cart and need to dodge the security carts that come after you. The trick is to just stay to the outside roads as much as possible. Don’t try grabbing the rockets or green balls, just keep moving. It’s a little challenging, but not super difficult.
Hi guys! So the video for Night Watch Island is here! (video credits to InsidersNetwork(YouTube))
Heres the written walkthrough!
The Areas There are 20 areas total. You go through three areas before you hit the Mall Atrium, the central hub on the map(also the central of the mall.). From the Atrium, you can reach the Manager’s Office, Mall Left, and Mall Right. Mall Left gives access to 6 stores, while another 7 stores are accessible from Mall Right.
Main Street
Parking Lot
Security Office
Mall Atrium
Manager’s Office (reached from the Atrium)
Mall Left (left to right):
3rd floor: PrintFax, Giuseppe’s Toys
2nd floor: In the Now Clothing, No Pain No Gain Fitness
1st floor: Crawl Mart Pet Store, JollyGifts Gift Store
Mall Right (left to right):
3rd floor: MacGuffin’s Gadgets, Good Deals Electronics, Carnival Costumes
There’s also various kiosks located around the Mall and are described as needed in the walkthrough below.
Part One: Get the Job
Part Two: Investigating the Alerts
Part Three: Find Eddie the Snake
Part Four: Capture the Burglar
Bonus Quest( members only!!): Find the Rare Sports Cards
PART ONE: Get the Job
When you jump out of your blimp, you land on Main Street next to a Bananabee’s (Applebee's.. Haha)restaurant (this island’s Common Room Area). You can only go right, to a line of people waiting outside the Twin Palms Mall.
The first guy in line tells you he buys everything MacGuffin makes to sell on the Internet. A redhead with freckles tells you that “this line is nothing, she waited in line for three weeks to buy voice-activated toilet paper.” Everyone else in line tells you how excited they are for the new MacGuffin gadget, even if they don’t know what it does.
Heading right, you reach the entrance to the Twin Palms Mall, but its locked. It’s after hours. Head right to the Security Office door and click on the red button and they’ll tell you the Mall doesn’t open until 7am. What to do now ? Continue right to the Parking Lot where you’ll find Gus, the crying former security guard. A clock tells you its 9:02pm. Talk to Gus and he tells you that he’s been fired after 10 years on the job and that the mall isn’t safe, then he walks off right. Go right to the PrintFax car and talk to the kid who tells you that it’s too bad about Gus, but the stress must have been too much for him. Then he drives off. Keep going right until you run into a guy in a Yankees hat, the owner of Slugger’s Store. He suggests that you talk to the mall manager and apply for the job of night-time security guard.
Head back to the Mall. On Main street, go back to the Security Office door and click the red button. The manager asks if you’re here for the night watchman job. Then she leads you through the security office and into the Mall Atrium. She needs to test you to see if you’re qualified for the job.
GAME: Spot the Differences
An image will appear that you have to study. Then another will appear and you have to click on the 5 differences. You can toggle back and forth between the images, so it’s not too challenging. The differences between Photo #1 and #2:
Dr. hare t-shirt design (second from right in second row down)
turquoise belt on wall
disco light
yellow star on red t-shirt on rack
jeans on floor point a different way
Things to look for: Dr. Hare t-shirt design, turquoise belt, red tee with yellow star, jeans on the floor, and the disco ball
Next the manager wants to test your ability to patrol. She tells you to jump on the scooter and patrol the mall looking for trouble. She’s set up robots to test you:
In front of the Chinese Food kiosk are two robots, a boy and a girl. Click on them to tell them “no loitering” and shoo them away. Roll right past the escalator to the next area called Mall Right.
In Mall Right, roll past the elevator and you’ll come across a robot granny in front of a New Store Coming Soon! sign.
Say hello to Granny Robot, then keep rolling right
At the escalators, you’ll find a robot boy trying to run up the down escalator, click on him to scold him for running up the escalator. He'll cry and break down. Roll back left to Granny.
You’ll see a robot burglar grab Granny’s purse. Quick, get after him! Head left back to the Mall Atrium to follow the robot.
You’ll run over the robot thief, but the Manager gives you the job. Congrats. The manager gives you a SECURITY GUARD BADGE and sends you to the Security Office to start your shift. Put on the BADGE. Congratulations, you’re now a night watchman for Twin Palms Mall!
PART TWO: Investigating the Alerts
An Alert appears on the huge security screen: “Disturbance in MacGuffin’s!” Before you investigate, check out the office:
energy drinks on the console – the manager warned you to avoid these
a corkboard – notes from Gus, the paranoid night watchman
a map of the mall – a great resource for finding what you need. In this case, MacGuffin’s is on the 3rd floor in Mall Right
Exit into the Mall Atrium. Run right to Mall Right. Click on the elevator button. Enter the elevator. When it drops you off at the 2nd floor, hit the elevator up button and re-enter the elevator. You’ll jump off at the 3rd floor. Head right to MacGuffin’s. Enter.
Inside MacGuffin’s are all kinds of strange electronics. Head left until you see a “Ringing” coming from a Quake-Master massage chair. Click on the chair to get the SMART PHONE. Answer the incoming call. It’s from Gus! It’s his phone that he lost. He says it’ll come in handy with thieves about. He teaches you the different apps:
Security camera – you can see the live feed from security cameras inside stores. In this case, you’re seeing inside MacGuffin’s. Gus tells you to find the mystery gadget that everyone’s talking about. Use your mouse to navigate to the far right and click on the Quick-Charger. Next he says to check out other cameras. Use the arrows at the lower left to toggle through the 12 different cameras (see the list below).
Contact list – preset numbers you can call:
Home (Gus) – give him a call if anything strange happens
Mall Manager – she’s getting ready for bed
Print Shop Owner – sitting in his apartment watching the game
Slugger’s Owner – wants to know if everything in his store is okay and when was the last time you checked on it?
Pet Shop Owner – suggests you check on the coral snake, who gets out of his cage now and again
Notes – empty for now
Planet Slug Game – “defend Earth by flinging bombs at them with patented slingtech3000 technology”, it’s just Angry Birds in space. The trick is to use the “+” sign as a marker. Start by pulling the rocket back exactly to the “+”. Depending on where the plus sign is, you’ll destroy something – either one of the slugs or an asteroid that’s in the way. If you destroyed the asteroid, fire your second rocket from the exact same position to get the top-most slug. If you hit the bottom slug from the “+”, you’ll need to adjust above or below the + to hit the second slug. Takes a little practice, but isn’t too difficult.
Power Button – click to return the phone to your backpack
Smart Phone Camera LIVE Security Feeds:
MacGuffin’s Gadget Store
Good Deals Electronics Shop
In the Now Clothing Store
CrawlMart Pet Shop
PrintFax Print Shop
Slugger’s Athletic Keepsakes
Slumbertown Mattress Store
JollyGifts Gift Store
Sizzle Tanning Salon
Giuseppes Toy Store
Carnival Costumes
No Pain, No Gain Sports Fitness Store
Leave MacGuffin’s and you’ll see your phone has an Alert.
What to do when you get an Alert:
Click on the flashing phone icon. This first alert is: “Security Alert in Slugger’s Athtletic Keepsakes!”
Then click on the “View Camera” button. [Bug - when we first clicked on the View Camera button, the room was supposed to be Slugger’s, but it was actually MacGuffin’s camera. If you get this, use the arrows at the bottom to scroll through the room a couple of times. Then go back to #6 and it should be fine.]
Using the security camera feed, scroll along the bottom of the room until the box is blinking and turns red. You’ll see some upended boxes and a football helmet.
At this point, Gus appears to give you the next piece of information. In this case, Gus tells you to call the owner.
Go to the Contact List app on the phone and call Slugger’s owner. He’ll tell you that you need to check to see if his Honus Wagner vintage baseball card, the most valuable card in the world, is okay. It’s in a safe behind a statue and the combination is 6723.
Go down to the 2nd level and Enter Slugger’s. Go to the the right of the store and click on the Statue that says “Take a picture with the champ!”. You’ll push the statue to the side, revealing the safe. Click on the safe and enter: 6723. The safe will open. Grab the HONUS WAGNER BASEBALL CARD.
CALL: Slugger’s Owner tells you he’s relieved it’s still there.
Click on the safe again to return the card, then click on the statue to push it back in place. Head back to the Mall Atrium.
ALERT: Giuseppe’s Toy Store! On the camera feed, use your mouse to scroll to the top of the screen to the overhead light. When you’ve hit the right spot, Gus will appear and tell you that the light being on is odd and you should check it out.
Run left to the area Mall Left. At the elevator, press the button and head up to the 3rd floor. Head left, remember to jump over the space where the escalator is, and enter Giuseppe’s. Inside Giuseppe’s, click on the red TOY BIRD to grab it. On the floor is a ROBOT TOY, grab it too. Seems the robot might have set off the lights.
Exit the store and head back to the Atrium.
ALERT: Sizzle Tanning Salon! Zero in on the closed tanning bed, the one on the left. Gus will tell you he thinks he knows what’s going on.
Run to Sizzle, in Mall Right on the 1st floor. Inside Sizzle, click on the lefthand tanning bed. An overly tan woman says she just wants to stay a few more minutes, even though the mall is closed. Leave Sizzle.
ALERT: Good Deal Electronics! When you start to look around with the live feed, the signal is lost! Gus tells you someone is in the mall and doesn’t want you to see.
Head to Good Deal on the 3rd floor of Mall Right. Inside Good Deal, head left and your phone will ring.
CALL: It’s Gus, who tells you that he could have sworn he just saw someone in the store.
To the left is an employee only room, but it’s locked. Exit the store and go back to the Atrium.
PART THREE: Find Eddie the Snake
ALERT: Crawl Mart! Move the camera to the far right. Gus confirms that the coral snake is missing!
Use your phone contact’s list to call the Pet Shop owner, who tells you that the snake, Eddie, might be hiding behind his favorite rock in his glass case. Head to Crawl Mart on the 1st floor of Mall Left. When you get to Crawl Mart, someone will threaten you so you leave. Don't listen to him/her.Inside Crawl Mart, go to the snake’s empty terrarium at the far right.
CALL: Crawl Mart Owner will tell you that you might be able to lure Eddie out with his favorite snack, just don’t use any of the store’s birds.
God thing you got a toy bird! Exit the store, where you’ll see Eddie, a moment before he takes off. Go after him. Follow him to the following locations where he’s hiding. The item he’s hiding in will be shaking. Click on the item and he’ll take off.
MacGuffin’s – a Pocket-Sized Porta-Potty
Sizzle Tanning – the right-hand tanning bed
Finally, you’ll find him in the Chinese Food kiosk in the Mall Atrium, where he’s ducked down behind the counter. Go into your backpack and use your TOY BIRD.
Eddie will eat the bird and take off again.
CALL: The owner tells you not to worry about it, he’ll get Eddie in the morning.
Head to Mall Right.
PART FOUR: Stop the Burglar
ALERT: Carnival Costumes! Once again you’ll lose the signal and need to go investigate.
Head up to the 3rd floor. Inside Carnival Costumes, go to the far left. There’s the costume for the cop and the one for the robber. Wait, that’s a real robber! He’ll knock you down as he’s escaping.
CALL: Gus tells you the thief is probably after the Quick-Charger gadget. He tells you to go to MacGuffin’s and stop moving so the lights turn off. You might be able to ambush the thief.
Following his instructions, enter MacGuffin’s. You’ll hide in the corner and the lights will go out. The burglar will sneak up and you’ll surprise him. When you do, he’ll drop a BACK ROOM KEY. Pick it up and go to Good Deal Electronics on the same floor. Go to the locked Employees Only door at the far left of the room. Go into your backpack and use your ROBOT TOY. He’ll keep the light on for you. Now use your KEY and enter the room.
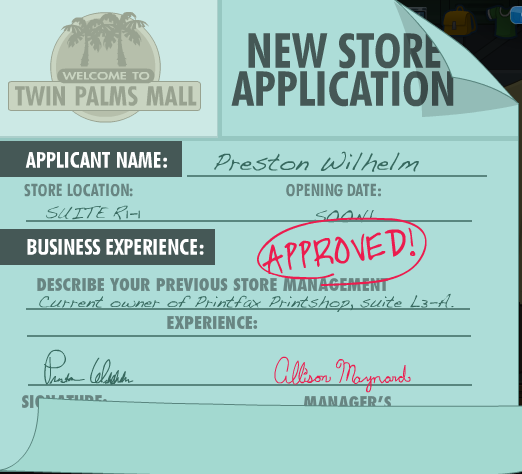
Inside the backroom, you’ll see a familiar apartment background (hmm…) and a computer with a note on it. Click on the note and you’ll see it’s a New Store Application:
Preston Wilhelm is the owner of the PrintFax shop. What’s he doing applying for a new store? Hm…
CALL: Gus suggests you check out PrintFax (Mall Left, 3rd floor)
As you get to the 3rd floor, the thief comes barrelling out in a security golf cart, rides down the escalators, and heads to the Atrium.
CALL: Gus tells you there’s a scooter you can use to chase after him in the Manager’s Office. (How does Gus know everything that’s happening to you? Weird.) Anyway, he sends you a list of possible passwords to the Notes app on your phone.
The Manager’s Office is on the 2nd floor of the Mall Atrium. To get to the office, run up the escalators at the right-hand side of the Atrium. The thief will appear and run over you again if you hang out in the Atrium too long. Time to get that scooter! Enter the Manager’s Office. Click the control panel for the scooter. The password is FROST. Unfortunately, the scooter needs to be charged. But how can you possible CHARGE the scooter QUICKLY? Hm. Wait, a minute…get to MacGuffin’s!
Inside MacGuffin’s, grab the QUICK-CHARGER. After all, you’re on official business. Go back to the Manager’s Office in the Atrium. Use the QUICK-CHARGER out of your backpack. Now jump on the scooter and exit the office. Take the down escalator to the first floor, go right to Mall Right, then turn around and go back into the Atrium. You’ll find out that the best way to catch the thief is to get behind the up escalator as he’s coming down. So, go to the far left of the Atrium. When he comes down in his golf cart, you’ll take off after him and he’ll crash. But wait, he’s a robot! You’ve been duped.
CALL: Gus tells you that you really blew it. Thanks Gus.
Go to Mall Right
ALERT: PrintFax Print Shop! The live feed shows the thief photocopying something. Get to PrintFax, stat!
Inside PrintFax click on the copy machine. Click Menu, then Reprint Last Scan, then the green Print button. It’s a copy of the Honus Wagner baseball card.
CALL: Gus wonders where the real card is. Time to return to Slugger’s.
In Slugger’s, click on the statue. Uh-oh.
CALL: You tell Gus it looks like the safe fell out of the wall into the floor below. He tells you to get the blowtorch from behind the picture in the Manager’s Office to use to cut through the padlock on the New Store. Head to the Office pronto.
Inside the Manager’s Office, click on the framed picture of the robot boy over the “employee of the month” sign. Grab the BLOWTORCH. Then head back to Mall Right. Go to the New Store front and equip the BLOWTORCH out of your backpack. Click enter to go into the New Store. Inside the New Store you find the thief. But he escapes up the wall before you can stop him. Jump up the ladder and click “go up” at the top.
Air Vent Chase You’re inside an air vent. You see the thief, but too bad-you can’t get by a red barrier. Equip your BLOWTORCH again and click on the barrier to torch it. Ha! Bye, bye barrier!Continue right and then up the ladder until you’re in a room with Ventilation System A and Ventilation System B written on the wall behind you.
You’ll start on the right side navigating through System B.
Jump right, over the rotating fan, into the vent. Torch the barrier. Head right, drop down, and torch the next barrier. Continue right, up the ladder to the top where it says “danger: elevator/escalator drive mech.” You’ve caught up to the thief, but he takes off again. Use your blowtorch on the barrier above you, then jump up. Travel left across the top of the red barriers then blowtorch the barrier you’re standing on when you’re past the moving machinery below you. Drop down and you’ll catch up with the thief again, who bumps you off the platform.
Go back through vent System B you just went through, but this time stop halfway up the ladder. You’ll see a beige barrier on your left. Torch it and step into the darkened vent shaft labelled “B”.
This is halfway up the ladder in Vent System A.
A fan will blow you up to the next level where you’ll find a switch with “A/C” on it. Torch it. The thief will tell you it’s not over.
Head back to the center Ventilation room and head left. The moving fan will keep you afloat while you torch the beige barrier into the System A vents. Head left then drop down the ladder. At the bottom, you’ll encounter the thief yet again. He’ll run up a ladder.
There’s an “A/C” switch on your right and a barrier on your left. Torch the switch, then torch the barrier. Go left and torch the next barrier. Head up the ladder. When you get to the top, torch the barrier and drop down into the room. “Gotcha, you’re trapped now!” you’ll say. AGAIN, the burglar takes off.
He jumps down, but you’ve torched the System A “A/C” so he crashes down and drops the Honus Wagner baseball card. You grab it and the two of you crash out of the large vent onto the Mall Atrium’s humungous fountain.
Just when you think he’s going to run away again, Eddie comes by on the scooter and knocks you and the thief silly. You all end up on the floor of the Atrium once you wake up. Gus has called the real cops and they unveil the thief.
Dun-Dun-Dun! Of course, it’s Dr. Hare! No, it’s really the print shop owner, as you’ve suspected since you saw his name on the new store application. Right?
CONGRATULATIONS! You got the burglar, saved the priceless baseball card, earned the undying respect of Gus and the Manager and and got your island medallion! Wait, what's that?
Bonus Quest for Members: Find the Rare Sports Cards The robot went haywire! Scattered around the mall are 9 collectible cards – Canada’s best athletes from the ‘1960’s! You’ve got to recover them. As you leave the Atrium, follow this order:
No Pain, No Gain – Left Mall, 2nd floor – far right of the room, the baseball shooter, the card is up on the rack of clothes, click on a baseball bat from the rack, then click on the shooter, now quickly run back and face the shooter just to the right of the rack. Hit the spacebar as the balls come at you and you’ll knock the card down. Easy peasy.
In the Now – Left Mall, 2nd floor – click on the large speaker to the left of the “Get in the Now” sign
Crawl Mart – Left Mall, 1st floor – in the piranha tank on the second level, you need to click on the card just as all of the piranha are moving away from it
JollyGifts – Left Mall, 1st floor – click on the exploding confetti can on the checkout counter, second in from the left
Go back to the Atrium and leave the mall through the security office, jump up to the top of the mall dome and the card is on the top. Head back inside.
“Saturn” – Mall Atrium, above the fountain – jump up the fountain and its on the middle planet, on one of “Saturn’s” rings. From here you can actually jump to the pizza kiosk to the right.
Space Time Pizza – Mall Atrium, 2nd level on the right – click on the lump of dough closest to the oven and quickly click on the card behind it.
Sizzle Tanning – Mall Right, 1st floor – click on the control panel of the first tanning bed until its on the lightest setting, simmer. Then click on the tanning bed.
Slumbertown – Mall Right, 2nd floor – use the sleeping masks cabinet to the left of the exit to jump up to the mattresses on the next level. Use the blue mattress to jump up onto the big purple mattress that’s at an angle. When you reach the floor, you’ll run back and see the card on the upper platform.
Head to Slugger’s to talk to the owner and return the missing cards. As a reward you get the Old-time Baseball Uniform!
Oh, and did you know? Before you get the Carnival Costumes alert, you can costumize all the costumes in Carnival Costumes. Comment below and send us the link of your avatar with an awesome costume!!! We are waiting!!